Records custom fields
While the InvenioRDM's metadata schema includes a wide range of bibliographic fields, there might still be cases where you need to include domain or system specific information in your records. This can be achieved using custom fields. To demonstrate how to take advantage of custom fields, we will use the following example:
At CERN, I want to input or select the experiment information of the research preprint that I am uploading. In addition, when searching for other preprints, I want to filter the search results by experiment name.
Warning
Before jumping into adding custom fields, take a close look at the optional fields as well as the default set of fields in the metadata schema. For example, the subjects field can be extended with terms from external vocabularies instead of creating custom fields.
Configuration
In order to add custom fields to your instance, you can use the following configuration variables:
RDM_NAMESPACES- Defines fields namespaces to avoid name clashes.RDM_CUSTOM_FIELDS- Defines the name, type, and validation rules of your fields.RDM_CUSTOM_FIELDS_UI- Defines how the fields are displayed in the uploads form UI.
Namespacing
Because each defined field requires a unique name, you might end up in a situation where fields with different semantic meanings but similar naming might clash. To avoid this issue and in order to provide additional semantic context to a group of fields, there is an optional (but recommended) namespacing mechanism.
The RDM_NAMESPACES config variable accepts key-value pairs of namespace prefixes and optional contextual information for the namespace (URL). In your invenio.cfg:
RDM_NAMESPACES = {
    # CERN
    "cern": "https://greybook.cern.ch/",
}
The keys of this config will be used to prefix field names. These prefixed names will be validated against the namespaces configuration, and raise an error in case the namespace doesn't exist.
Declaring custom fields
You can configure custom field by listing them in the invenio.cfg:
from invenio_records_resources.services.custom_fields import TextCF
from invenio_vocabularies.services.custom_fields import VocabularyCF
from marshmallow_utils.fields import SanitizedHTML

RDM_CUSTOM_FIELDS = [
    VocabularyCF(  # the type of custom field, VocabularyCF is a controlled vocabulary
        name="cern:experiment",  # name of the field, namespaced by `cern`
        vocabulary_id="cernexperiments",  # controlled vocabulary id defined in the vocabularies.yaml file
        dump_options=True,  # True when the list of all possible values will be visible in the dropdown UI component, typically for small vocabularies
        multiple=False, # if the field accepts a list of values (True) or single value (False)
    ),
    TextCF(  # a text input field that will allow HTML tags
        name="cern:experiment_description_html",
        field_cls=SanitizedHTML,
    ),
]
Defining a custom vocabulary
For a VocabularyCF field to work, you need a custom vocabulary for it to search from. First you'll want to edit app_data/vocabularies.yaml to add the name of the vocabulary
cernexperiments:
  pid-type: cexp
  data-file: vocabularies/cern_experiments.jsonl
You can read more about all the vocabulary options in that documentation section.
For our example, you'll then want to make a file app_data/vocabularies/cern_experiments.jsonl with content
{"id": "ATLAS", "title": {"en": "ATLAS"}}
{"id": "LHC", "title": {"en": "Large Hadron Collider"}}
If you've already set up your services, you can create this vocabulary with
pipenv run invenio rdm-records fixtures
You can see then see the vocabulary at /api/vocabularies/cernexperiments
Customizing validation and error messages
In the reference section, you can find the complete list of available custom field types. You can also customize each field type:
- The
field_clsparameter allows you to change the Marshmallow field that will be used to validate the input data. For example, for aTextCFyou could useSanitizedUnicode(default), orSanitizedHTML(to allow only safe HTML tags), or your own Marshmallow field implementation. - The
field_argsparameters allows you to customize the behavior of the previous (field_cls, or default) Marshmallow field class.
For example, to make a field required, customize error messages, or pass a custom validation function, you can customize the TextCF in your invenio.cfg as the following:
from invenio_records_resources.services.custom_fields import TextCF
from marshmallow import validate

RDM_CUSTOM_FIELDS = [
    TextCF(
        name="cern:experiment_url",
        field_args={
            "validate": validate.URL(),  # must be an implementation of Marshmallow.validate.Validator
            "required": True,
            "error_messages": {
                "required": "You must provide the experiment homepage URL."
            }
        },
        multiple=False,
    ),
]
Custom error message when the field is required

Custom validation function to validate the new field

Initialize
When you have completed the configuration of the custom fields, you will need to run the CLI commands below to make the fields searchable. Failing to do so will result in an error when indexing records and you won't be able to search values for the custom fields. In a shell, run:
cd my-site

# initialize all custom fields to make them searchable
pipenv run invenio rdm-records custom-fields init
When you want to make a new specific field searchable:
# initialize specific custom fields to make them searchable
pipenv run invenio rdm-records custom-fields init -f cern:experiment -f <field_name>
Tip
The CLI commands above are automatically executed when you setup a new instance with invenio-cli services setup.
If you have added the custom fields configuration before running the setup, you don't need to run the commands above.
Info
If you have added the custom fields configuration, with some required fields, before running the first setup, it will fail.
This is because the demo data created during the setup do not contain the custom fields and the required value will be empty. As a workaround:
- define all custom fields without using the required parameter
- run the setup command
- put back the required parameter in the config
If, instead, you don't need to populate your instance with demo data, simply run invenio-cli services setup --no-demo-records.
Displaying fields
Now that you have defined and initialized your custom fields and configured their type and validation rules, you need to configure how you want them to be displayed on the upload form and landing page using the following properties:
section- Title of the section.hide_from_landing_page- Controls whether the custom field section is displayed in the landing page.hide_from_upload_form- Controls whether the custom field section is displayed in the upload form.fields- Ordered list of fields to be included in the section.
Each field can then be configured using the following properties:
field- The name of the custom field.template- The jinja template used to render a field in the landing page.ui_widget- The React form component to be used for the field.props- Parameters to be injected in the React component.
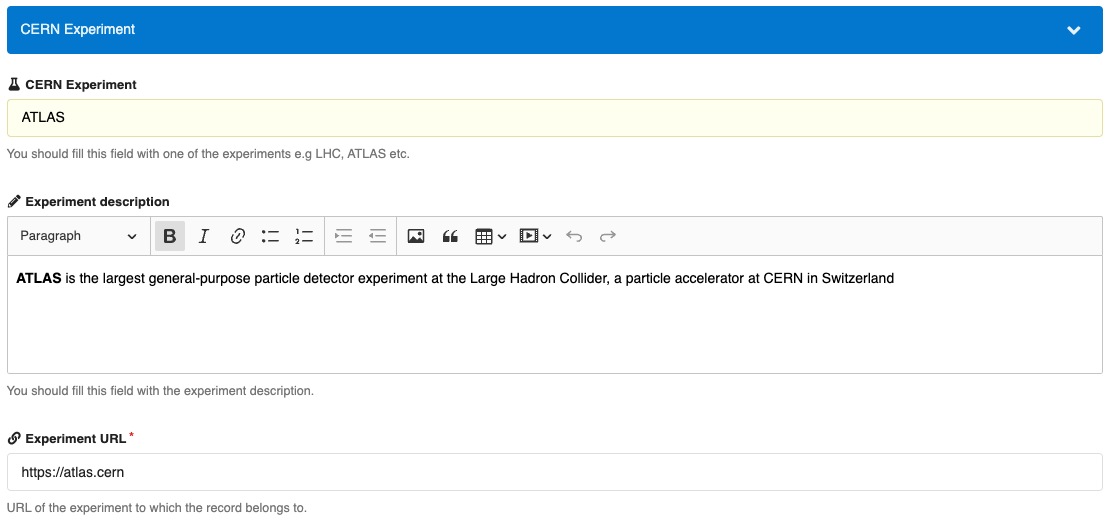
Upload (deposit) form
Custom fields are displayed at the bottom of the upload form and are organized into sections. Each section has a title and the ordered list of the fields that it includes.
Title of the section can be configured using the property section, while the list of fields the property fields. Note that each field is an object that corresponds to an already defined field from the RDM_CUSTOM_FIELDS config.
# for the above configured fields `cern:experiment`, `cern:experiment_description_html`, `cern:experiment_url`
RDM_CUSTOM_FIELDS_UI = [
    {
        "section": _("CERN Experiment"),
        "fields": [
            dict(
                field="cern:experiment",
                ui_widget="Dropdown",
                props=dict(
                    label="CERN Experiment",
                    placeholder="ATLAS",
                    icon="lab",
                    description="You should fill this field with one of the experiments e.g LHC, ATLAS etc.",
                    search=False,  # True for autocomplete dropdowns with search functionality
                    multiple=False,   # True for selecting multiple values
                    clearable=True,
                )
            ),
            dict(
                field="cern:experiment_description_html",
                ui_widget="RichInput",
                props=dict(
                    label="Experiment description",
                    placeholder="This experiment aims to...",
                    icon="pencil",
                    description="You should fill this field with the experiment description.",
                )
            ),
            dict(
                field="cern:experiment_url",
                ui_widget="Input",
                props=dict(
                    label="Experiment URL",
                    placeholder="https://your.experiment.url",
                    icon="linkify",
                    description="URL of the experiment to which the record belongs to.",
                    required=True,
                )
            ),
        ]
    }
]
The upload form will then look like below:
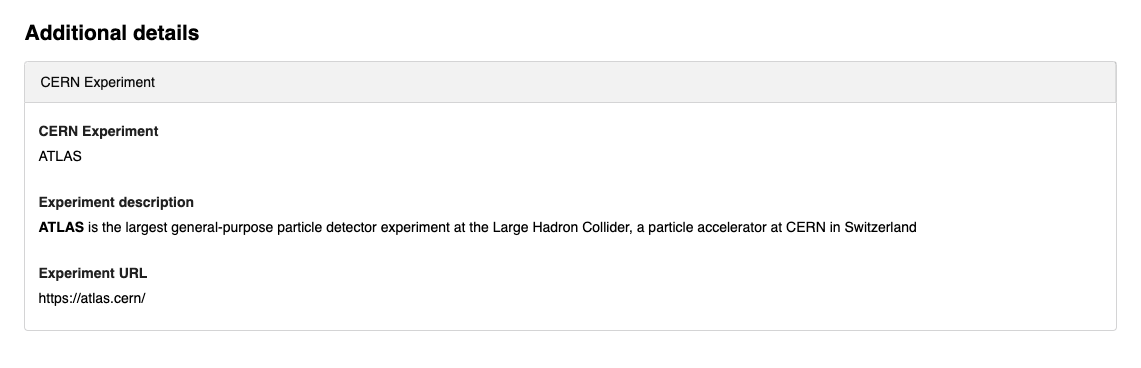
Landing page
In the record landing page, by default, the custom fields will be displayed in the additional details section at the bottom of the page. Each custom fields section correspond to a tab item, containing the configured fields. This can be disabled using the hidden attribute in the section's configuration.
The additional details section:
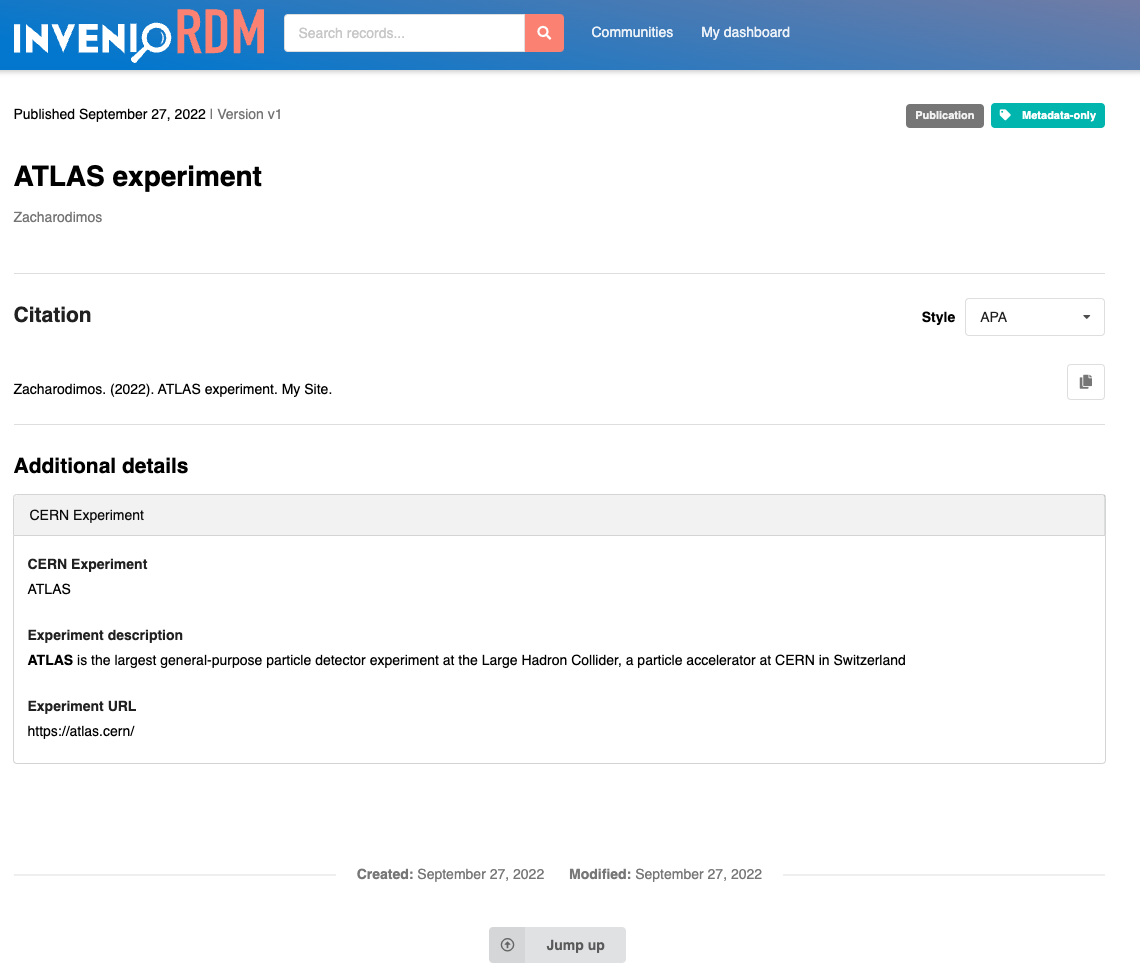
The landing page with the configured custom fields:
However, it is possible to change this default layout by overriding the Jinja templates of the landing page.
You can change how a specific field is displayed in the additional details section via the template parameter:
RDM_CUSTOM_FIELDS_UI = [
    {
        "section": _("Quickstart example section"),
        "fields": [
            dict(
                field="programming_language",
                ui_widget="Input",
                template="/my_template.html"
                props=dict(
                    label="Programming language",
                    placeholder="Python...",
                    icon="pencil",
                    description="The programming language of your choice...",
                )
            ),
        ]
    }
]
You should add the my_template.html file in the my-site/templates folder in your instance. In your custom template, the following variables are injected and can be used:
field_value: the value of the field, as it is stored in the record after the UI serialization i.e. what is returned from theui_fieldmethod when you define your custom field.field_cfg: the UI configuration for that specific field as it is defined in theRDM_CUSTOM_FIELDS_UIconfig.
See the example in the How-to.
Search
For custom fields that are keywords or vocabularies, you can add your custom field to the search page as a facet/filter:
Vocabularies
from invenio_rdm_records.config import RDM_FACETS, RDM_SEARCH
from invenio_records_resources.services.records.facets import CFTermsFacet

RDM_FACETS = {
    **RDM_FACETS,
    "experiment": {
        "facet": CFTermsFacet(  # backend facet
            field="cern:experiment.id",  # id is the keyword field of a vocabulary
            label=_("CERN Experiment"),
        ),
        "ui": {  # ui display
            "field": CFTermsFacet.field("cern:experiment.id"),
        },
    },
}

RDM_SEARCH = {
    **RDM_SEARCH,
    "facets": RDM_SEARCH["facets"] + ["experiment"]
}
In the search page, the new facet will be added in the bottom as below:

Text fields
To showcase this configuration let's take the experiment-example, but this time not as a vocabulary of experiments but a "free text input".
Keyword
If the custom field will contain text values that only need to be searched as "exact match" (e.g. names or other short text values), then using a keyword is the correct option. On the other hand, if the values are long (e.g. a description or abstract) or need to be searchable (e.g. finding trees when searching for tree, i.e. not an "exact match") then using a TextCF is preferable.
RDM_CUSTOM_FIELDS = [
    KeywordCF(name="cern:experiment"),
    ...
]

from invenio_rdm_records.config import RDM_FACETS, RDM_SEARCH
from invenio_records_resources.services.records.facets import CFTermsFacet

RDM_FACETS = {
    **RDM_FACETS,
    "experiment": {
        "facet": CFTermsFacet(  # backend facet
            field="cern:experiment",
            label=_("CERN Experiment"),
        ),
        "ui": {  # ui display
            "field": CFTermsFacet.field("cern:experiment"),
        },
    },
}

RDM_SEARCH = {
    **RDM_SEARCH,
    "facets": RDM_SEARCH["facets"] + ["experiment"]
}
Text
For a text field to work also as a facet/filter in the search, it needs to be defined as such via the use_as_filter flag.
Note that it is not recommended to have filter over very long text values (more than 250 characters) since it could noticeably affect the search engine's performance.
RDM_CUSTOM_FIELDS = [
    TextCF(name="cern:experiment", use_as_filter=True),
    ...
]
What will happen under the hood is that the text will be indexed both as text search, but also as exact match. The latter is required to support filtering by its values.
In addition, when configuring the facet, the field needs to be suffixed by keyword:
from invenio_rdm_records.config import RDM_FACETS, RDM_SEARCH
from invenio_records_resources.services.records.facets import CFTermsFacet

RDM_FACETS = {
    **RDM_FACETS,
    "experiment": {
        "facet": CFTermsFacet(  # backend facet
            field="cern:experiment.keyword",
            label=_("CERN Experiment"),
        ),
        "ui": {  # ui display
            "field": CFTermsFacet.field("cern:experiment"),
        },
    },
}

RDM_SEARCH = {
    **RDM_SEARCH,
    "facets": RDM_SEARCH["facets"] + ["experiment"]
}
Reference
This section lists the field types and UI widgets that are available in InvenioRDM.
Field types
KeywordCFfor text that needs to be searchable only as "exact match" (e.g. search filters/facets).TextCFfor normal text, if you need to search as "exact match" (e.g. search filters/facets) passuse_as_filter=Trueas parameter.VocabularyCFfor controlled vocabularies. Note that it supports only generic vocabularies. That is, names, awards, etc. cannot be linked to a custom field.ISODateStringCFdate strings in ISO format (YYYY-MM-DD).EDTFDateStringCFdate string in extended date time format, i.e. DATE or DATE/DATE where DATE isYYYYorYYYY-MMorYYYY-MM-DD.BooleanCFfor boolean values (True/False).IntegerCFfor integer numbers.DoubleCFfor integer and floating point numbers.
UI widgets
Inputfor one line text input.MultiInputfor multi value text input, similar to the subjects field.TextAreafor long text descriptions.RichInputfot long text descriptions with WYSIWYG editor.Dropdownfor a value from a controlled vocabulary or a list of controlled vocabularies. The correspondingVocabularyCFmust have the parameterdump_options=True.AutocompleteDropdownfor a value from a controlled vocabulary or a list of controlled vocabularies. The correspondingVocabularyCFmust have the parameterdump_options=False. This widget will provide suggestions to autocomplete the user input. Similar to subjects, languages, names, etc.
You can see a detailed view of all the available widgets at the UI widgets reference section.