Creating a new custom field
Introduced in InvenioRDM v10
This guide describes how to create your own custom field. If you have not done it yet, please read first about configuring records custom fields. The new custom field in this example will extend the use case described in the records custom field documentation:
When uploading a research preprint at CERN, I want to record the title and the research program of the related CERN experiments.
Let's implement a new field experiments, which will be a list of objects with the following structure:
{
  "experiments": [
    {
      "title": "ATLAS",
      "program": "LHC"
    },
    {
      "title": "ALICE",
      "program": "LHC"
    }
  ]
}
Let's define a new custom field type. For convenience, we will define the new custom field type in the my-site/invenio.cfg where the application configuration resides. Therefore, no import will be needed to use it in the RDM_CUSTOM_FIELDS variable.
from invenio_records_resources.services.custom_fields import BaseListCF
from marshmallow import fields
from marshmallow_utils.fields import SanitizedUnicode

class ExperimentsCF(BaseListCF):
    """Experiments with title and program."""

    def __init__(self, name, **kwargs):
        """Constructor."""
        super().__init__(
          name,
          field_cls=fields.Nested,
          field_args=dict(
            nested= dict(
                title=SanitizedUnicode(),
                program=SanitizedUnicode()
            )
          ),
          multiple=True,
          **kwargs
        )


    @property
    def mapping(self):
        """Return the mapping."""
        return {
            "properties": {
                "title": {
                    "type": "text"
                },
                "program": {
                    "type": "text"
                },
            }
        }
Implement the new UI widget
Let's now create the new UI widget in a file Experiments.js in my-site/assets/templates/custom_fields:
import React, { Component } from "react";

import { Input, Array } from "react-invenio-forms";
import { Grid, Form, Button, Icon } from "semantic-ui-react";

const newExperiment = {
  title: "",
  program: "",
};

export class Experiments extends Component {
  render() {
    const {
      fieldPath, // injected by the custom field loader via the `field` config property
      title,
      program,
      icon,
      addButtonLabel,
      description,
      label,
    } = this.props;
    return (
      <Array
        fieldPath={fieldPath}
        label={label}
        icon={icon}
        addButtonLabel={addButtonLabel}
        defaultNewValue={newExperiment}
        description={description}
      >
        {({ arrayHelpers, indexPath }) => {
          const fieldPathPrefix = `${fieldPath}.${indexPath}`;
          return (
            <Grid>
              <Grid.Column width="7">
                <Input
                  fieldPath={`${fieldPathPrefix}.title`}
                  label={title.label}
                  placeholder={title.placeholder}
                  description={title.description}
                ></Input>
              </Grid.Column>
              <Grid.Column width="8">
                <Input
                  fieldPath={`${fieldPathPrefix}.program`}
                  label={program.label}
                  icon={"building"}
                  placeholder={program.placeholder}
                  description={program.description}
                ></Input>
              </Grid.Column>
              <Grid.Column width="1">
                <Form.Field style={{ marginTop: "1.75rem", float: "right" }}>
                  <Button
                    aria-label={"Remove field"}
                    className="close-btn"
                    icon
                    onClick={() => arrayHelpers.remove(indexPath)}
                    type="button"
                  >
                    <Icon name="close" />
                  </Button>
                </Form.Field>
              </Grid.Column>
            </Grid>
          );
        }}
      </Array>
    );
  }
}
Since we added a new Javascript file, we need to rebuild our assets:
$ invenio-cli assets build
Where to place a custom UI widget?
Custom UI widgets can be implemented in multiple places. Besides in the instance, they can also be implemented in other modules such as
react-invenio-deposit or react-invenio-forms, however be aware that "where" to place a widget depends on "who" needs the custom field.
Layout template
Let's now create the template that will be used to display the newly added field in the record landing page. We create a new file experiments.html in my-site/templates:
<dt class="ui tiny header">{{ _("Experiments")}}</dt>

{% for value in field_value %} {{value.get("title", "Unknown")}} ({{
_("Program") }}: {{value.get("program", "Unknown")}}) {{ ", " if not loop.last
}} {% endfor %}
Configuration
Finally, we need to add the new field to the RDM_CUSTOM_FIELDS and RDM_CUSTOM_FIELDS_UI configuration:
RDM_CUSTOM_FIELDS = [
    ExperimentsCF(name="experiments")
]

RDM_CUSTOM_FIELDS_UI = [{
    "section": "CERN Experiments",
    "fields": [{
        "field": "experiments",
        "ui_widget": "Experiments",
        "template": "experiments.html",
        "props": {
            "label": _("Experiments"),
            "title": {
                "label": _("Experiment title"),
                "placeholder": _("Add the title..."),
                "description": _("Add the title of the experiment e.g ATLAS")
            },
            "program": {
                "label": _("Experiment program"),
                "placeholder": _("Add the program..."),
                "description": _("Add the research program in which the experiment belongs to e.g LHC")
            },
            "addButtonLabel": _("Add new experiment"),
            "icon": "lab",
            "description": "Add all the experiments in which your record belongs to."
        }
    }]
}]
Custom field initialization, in a new shell run:
$ cd my-site

$ pipenv run invenio rdm-records custom-fields init -f experiments
See it in action
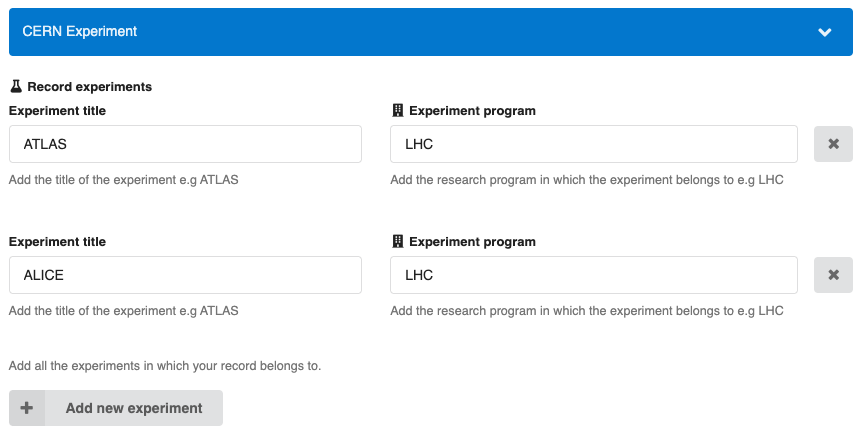
Upload form
The new field will be displayed at the bottom of the upload form:
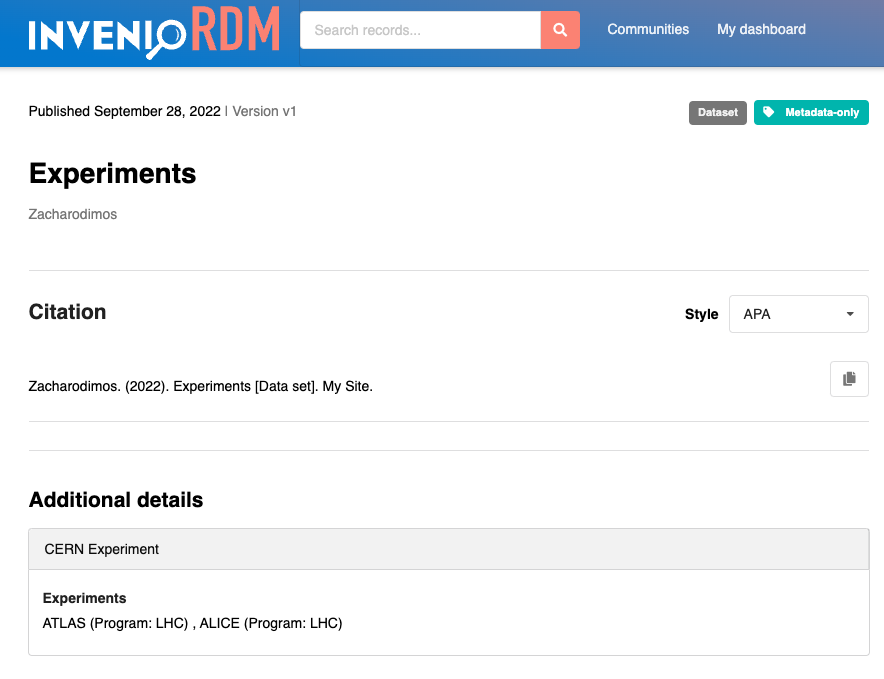
Record landing page
The new field will be displayed in the record landing page: